

Pages
Organize Pages & Structure
The navigation of your documentation is generated from the page list on the left in the editor (Content tab). Pages can be nested, sorted, and renamed.
Create pages and subpages
Use the + at the top of the page list to create a top-level page.
You can access subpages, rename, and delete options via the actions that appear when you hover over a page.
Order and nesting
Drag and drop pages to reorder them—both in sequence and hierarchy (dragging a page into another makes it a subpage).
Use the arrow symbol to expand and collapse branches.
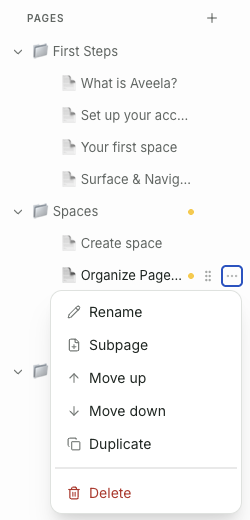
Rename and delete
Renaming is done directly in the list.
Deletion is done via the page actions; a confirmation prompt verifies the process.
Preview and Share
At the bottom of the page list, two actions are available:
Preview as customer – opens the documentation in a new tab as your customers see it.
Share link – copies the shareable link. If the Space still contains draft pages, you will be warned first – these pages are not visible in the shared version.

Each page has its own status (Draft / Published). For more on publishing individual pages and entire Spaces, see the chapter Publish & Share.